
On tap for today: Digital photography and alteration
I work with the Canon Digital Rebel XT. It takes great photos. But what to do when you want to alter a photo? I've had great success with Microsoft Photo Editor (no longer available with Vista) and would sometimes use multiple programs to achieve the desired results. I've just begun to delve into Photoshop with Photoshop Elements 4.0 and I'll share as I learn.
First up: Changing background color.

First: open the pic in Photoshop and Press Ctrl+J to make an editable layer of the image (as opposed to the background layer).
Using the magic wand tool, I begin to select the background. *Tip: it's often easier to select the background and then inverse the selection than to get all the colors of the foreground image.
Start with a pretty high tolerance if the color is significantly different than the foreground (maybe 80). My colors were all pretty similar, so I started the selection at 35 and went down to 10-15 for detail work.
Press Shift while clicking to add an area to the selection.
Press Alt while clicking to tell it not to select an area.
Once you have the background selected, right-click and select the inverse. (Now your foreground image is selected). Press Ctrl+J to make a new layer with your selected image.
Now for the fun part: Select the layer that is currently sandwiched between your background and your selected image (it's just a copy of your original pic). Click the 'Enhance' tab and then colors: Hue/Saturation. *Tip: make sure to check the "Colorize" box in the pop-up!
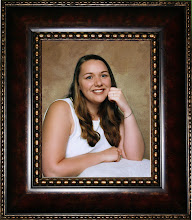
Now you can change the hue and saturation levels at whim! Play with this layer as much as you like until the background is the color you want. Here's my finished pic:

Now the focus is on her smiling face!
If you have any other great tips on the subject, please post them! Comments welcome!


It looks great, Kim!
ReplyDelete